Time for another 'How to' post. A good friend and fellow blogger asked me recently about how I made my blog button. When you first look at something to do with blog design or making something for your blog at first glance you might thing 'I'll never be able to do that' but that's where you're wrong! If I can do it then anyone can! I can't remember where I learnt to do this originally but I do remember looking through lots of posts trying to find the easiest way of doing it and some I originally tried but didn't work for me. So here's my tutorial to explain how I did it and why you may want to have your own blog button.
Some of you might be thinking 'what's the point of having a blog button?' Well why do we blog? People blog for many reasons, they enjoy it, they feel they have a story to tell, to create an awareness around certain issues such as MS, to promote a business, the reasons are endless. I'm pretty sure like me you want people to read your blog and to gain new followers/readers. For that reason you need to promote it. Having a blog button means your followers can grab your button and put it on their blog so if any of their readers like the look of your button they can click on it and it will take them to your blog home page so they can check it out. Whether many people click on blog buttons I don't know but its a great way to promote your blog and you can swap buttons with your blog buddies so you can promote each others blogs. If you ever join in on a blog hop or any blog challenges you can use them then too. To display someones blog button is a great way to support their blog.
So how is it done?
Just 4 simple steps, honestly!
1) Design and make your blog button.
2) Get your button direct URL.
3) Get the HTML code and edit it with your blog details.
4) Put it on your blog.

Your button needs to represent your blog (stating the obvious, I know), it's only small so you want it to be eye catching. For this part you need to use image editing software. There are lots of fantastic free software out there and each have their benefits. It depends what I want to do as to which I use I often use several to achieve what I want in the end. If your lucky enough to have image editing software such as adobe photoshop which is unfortunately pretty pricey you could probably do it with just one programme
I have mentioned these in previous posts but here are links to the software I use -
The process will vary depending on your blog design but for the purpose of explaining things I will tell you how I made mine. If you have already made your button then move on to step 2.
Before starting you will need to download any images you want to use to your computer. There are tons of sites which offer free digital scrapbooking downloads or you can get really creative and make your own from scratch.
Generally it is recommended that blog buttons are 125x125 pixels, this size will fit most side bars. Remember if you make it too large people may not want to display it on their blog. You could go to 150x150 pixels if you wanted it that little bit bigger (I have seen plenty of blog buttons that are even bigger but it's up to you). Here are examples of advised sizes below -
 |
| 125x125 |
 |
| 150x150 |
To edit images upload them to your chosen programme, for this I used pixlr.
To re-size image click on 'image' on the navigation bar, then click on 'image size'.
*I'm not sure what size I made my button as at the time I did mine I knew less about how to use the software but somehow I got what I wanted in the end*

 |
| re-sized background image |
Next I made my centre image which I took for from my header. I uploaded my image to pixlr and using the crop tool cropped the image down so I just had the flower patterned section -


I now have my centre image.
For the next part I used picmonkey to add a border around the centre image which I then saved to use later. That's pretty simple to do you just need to upload image click on border and then choose the style, colour and size you want your border to be.

 |
| centre image |
Now I have my 2 images for my button I needed to layer the centre image on top of the background. It depends on what software you use as to how you do this but on fotoflexer you can upload both images, click on the layers tab and arrange the layers, you may need to push back or pull forward an image so that they are sitting correctly on top of each other. I will be doing another tutorial on layering images if you want to know exactly how it's done or feel free to contact me and I will explain all.
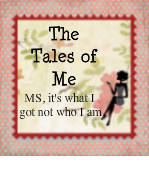
Once I merged the two images I added the writing and voila I have my blog button!
At the time I used a programme called picnic which has been taken over by picassa, that's how I add the cute image of the lady on to my button.

Now you have your image you need to find out your images direct URL. To do this again there are a number of sites but I used Photobucket.
- Upload your image to photobucket (you have to sign up or can sign in with Facebook or Twitter).
- Find your image in your albums and beneath your image you will find the direct URL. You can either copy and paste it into a blank word document, write it down or I tend to leave photobucket open on another tab ready for me to use when I need it.


Now I'm a novice at all this and self taught so I'm afraid I can't explain all the technical stuff for you in detail but what you need to do is very simple.
- Click on the design tab and then go to template.
- Click on add a gadget and then choose HTML/Java script.
- Copy the HTML code that is below the screen shot and paste it into the widget box.
- Lastly change the writing highlighted in red for your own blog.

<center><a href="http://itswhatigotnotwhoiam.blogspot.co.uk/" target="_blank" title="Button"><img alt="Button" src="http://i264.photobucket.com/albums/ii170/Kateb08/FotoFlexer_Photoed1.jpg" /></a><center>
</center>
<center><textarea id="code-source" rows="3" name="code-source"><center><a href="http://itswhatigotnotwhoiam.blogspot.com"><img border="0" src="http://i264.photobucket.com/albums/ii170/Kateb08/FotoFlexer_Photoed1.jpg" /></a></center></textarea></center></center>
The red writing needs to be changed to your blog web address, as you can see in the HTML code my blog address is http://itswhatigotnotwhoiam.blogspot.co.uk
The blue writing needs to be changed to your image URL, my image URL is http://i264.photobucket.com/albums/ii170/Kateb08/FotoFlexer_Photoed1.jpg.
If you click on Rich text in the right-hand corner of the gadget box your button with a grab code box should appear and you know you've done it right! *a round of applause*


Now you have changed my details to yours you can save the gadget and then check out your blog to see your new blog button and grab code. You can change the position of where the button will appear on your blog in layout. Make sure you type everything exactly otherwise it won't work! Just take a glance to your right, you may need to scroll down and you will see my blog button with the grab box underneath to give you an idea of what one looks like.
Now all the hard work is done you just need to share your button. If someone wants to put your button on their blog all they need to do is copy the code from the grab box and paste it in a HTML/JavaScript gadget and the button will be displayed on their blog but without the grab box and the same goes for you if you want to put someones button on yours.
If you have any questions then leave a comment below or go to my contact me page. If you make your own blog button or even if you're thinking about giving it a go then let me know below and when it's done we can we can swap buttons! I'd love to hear how you get on and see your handy work!
Hi there! What I great tutorial on how to make a blog button! Wish I had this guide when I started making mine!
ReplyDeleteAnyway, I saw your post on blogaholics and wanted to say hi and show your blog some love! I am your newest follower. :)
Feel free to come visit and follow mine! I look forward to coming back and checking out more of your helpful posts!
Best Wishes!
Mia @ The Muses Circle
Hey Mia,thanks for stopping by and comment. Glad you enjoyed what you've read. I shall hop over to your blog now and check it out.
DeleteGreat to meet you
:)